![]()
/ Interface / Image Editor
ChucK VM Panel . Workspace Panel
Code Editor . Graph Editor . Grid Editor
Image Editor . SoundPlayer
Log Panel . Graphical Plots
Wherein we present a simple, integrated image viewer and editor.
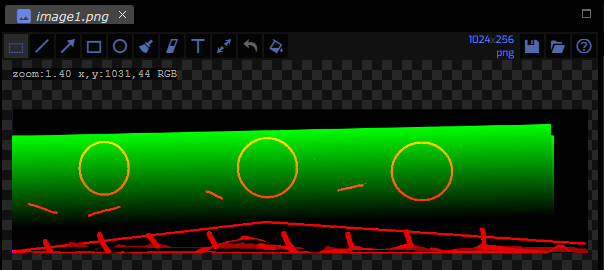
ImageEditordisplays and edits.pngand.jpgfiles. It is a simple viewer / editor with controls for viewing and editing (painting, drawing) an image file.Why, you may be thinking, should an image editor be a component in an audio app like Fiddle? As it turns out, images are a reasonable representation for some audio processes. For example, the Spectral node implements dynamic spectral filtering specified as a spectrogram in a
.pngfile. The CCImageSampler node can be used to generate arbitrary control-messages.When authoring effects for Spectral, CCImageSampler, etc, it's very convenient to have an image editor integrated into the Fiddle environment. You can easily view any images in your workspace and you can even modify an image live during performance or testing.
ImageEditor is also quite handy for building out Fiddle documentation since screen-shots generally need to be cropped, edited and tracked.
ImageEditor is likely to be unfit for serious image editing or for viewing images in formats like
.exr,.tif, etc. For full-featured image editing, we heartily recommend Krita and/or GIMP.
Image Editor Panel
Here's a look at the ImageEditor panel. In place of the Fiddle-standard menubar, is a toolbar comprised of common image-editing tools. Most of these tools represent a mode of operation when dragging the mouse within the image area.
As with other Fiddle editing panels the tab area is italicized indicating that the panel may be reused if another image is selected in the workspace panel. Once you modify the image (or double-click on the tab), the italics disappear and new workspace-image selections will appear in other ImageEditor panels.
Image Area
The image area is where editing occurs. When you click or drag in this area the current tool goes into action. This is pretty basic stuff so we'll leave the remaining words to your imagination. The key question of what will happen in the image area is answered by the toolbar settings.
Toolbar
Here are the roles associated with toolbar icons.

Tools are either persistent or momentary and some momentary tools are hidden
to conserve screen space. Many tools have an associated hotkey to
activate it. You can hover the mouse over the icons to see both
hotkey and function. When a tool is selected, it may augment the toolbar
with tool-specific controls. For example, here are the controls that appear
when the line tool is activated:

Per-tool controls can be hovered for functionality. In this example L is line-start color, LE is line-end color, W is line-width and SH controls whether drop-shadows are added.
Tools
The active tool determines the effect of mouse clicks within the image area.
Tool hotkey |
Description |
|---|---|
Select s |
Mouse drags selection rectangle. |
Line l |
Mouse draws a line with specified width, start and end color. Hold down Shift to constrain the line direction. The endcap can be changed via the settings dialog. |
Arrow a |
Mouse draw triangle with specified width and color, arrow head optional. Hold down Shift to constrain the arrow direction. |
Rect r |
Mouse drags rectangle with specified stroke and fill color, shadows optional. Hold down Shift to constrain the aspect ratio. |
| Ellipse | Mouse drags circle/ellipse with specified stroke and fill color, shadows optional. Hold down Shift to constrain the aspect ratio. |
Paint b |
Mouse drags paintbrush with specified width and stroke color |
Erase e |
Mouse drags eraser with specified width |
Text t |
Mouse positions cursor for text entry with many controls |
| Fill | Mouse-click triggers flood fill with specified sensitivity |
Selection Ops
Image Op commands are momentary, usually undoable, pixel or image edits. They usually require a selected region. Commands below that don't require a selection are marked with (!). Since they require a selection, the select tool must be active.
Command hotkey |
Description |
|---|---|
Select All Cmd/Ctrl a |
Select-all (when Select tool is active). (!) |
Select None Escape |
Select-none |
Clear Selection Delete |
Erases pixels therein. |
Copy Ctrl/Cmd c |
Copies selected pixels to clipboard. |
Cut Ctrl/Cmd x |
Cuts selected pixels to clipboard. |
Crop c |
Crops the image. |
Flip X f |
Flips pixels in X. |
Flip Y y |
Flips pixels in Y. |
Pixelize p |
"Pixelizes" pixels. Uses Pixelize size in settings. |
Blur 6 |
Blurs pixels. Uses Pixelize size in settings. |
Brightness 7 |
Brightens pixels. |
Contrast 8 |
Increases pixel contrast. |
Saturate 9 |
Increases color saturation. |
Invert 0 |
Inverts pixel values. |
Sharpen ^ |
Sharpens selected pixels. |
Erode ^ |
Erodes selected pixels. |
Dilate ( |
Dilates selected pixels. |
Turbulence ) |
Adds turbulence to selected pixels. Uses Noise settings. |
Fractal _ |
Adds fractal to selected pixels. Uses Noise settings. |
Global Ops
Global operations don't require a selection and perform global operations.
Command hotkey |
Description |
|---|---|
Rotate / |
Rotates entire image clockwise 90 degrees. (!) |
Resize . |
Raises the resize dialog to resize the image and or canvas. (!) |
Settings i |
Raises the settings dialog. (!) |
Grid Settings I |
Raises the grid settings dialog. (!) |
Toggle Grid g |
Toggles whether the grid is drawn. (!) |
Undo Cmd/Ctrl z |
Enabled when the undo queue contains items. (!) |
Redo Cmd/Ctrl y |
Enabled when the redo queue contains items. (!) |
Clear Cmd/Ctrl n |
Triggers image clear. (!) |
Save Cmd/Ctrl s |
Enabled when the image has been modified. (!) |
Save as Cmd/Ctrl s |
Prompts for new image name and location. (!) |
Open Cmd/Ctrl o |
Prompts to open exiting image file. (!) |
Cancel Esc |
Cancels or complete the current operation. (!) |
Zoom z, Ctrl/Cmd Wheel |
Zooms in. (!) |
Zoom x, Ctrl/Cmd Wheel |
Zooms out. (!) |
Scroll X Shift Wheel |
Scrolls horizontally. (!) |
Scroll Y Wheel |
Scrolls vertically. (!) |
Red 1 |
Displays/Edits Red Channel. (!) |
Green 2 |
Displays/Edits Green Channel. (!) |
Blue 3 |
Displays/Edits Blue Channel. (!) |
Alpha 4 |
Displays/Edits Alpha Channel. (!) |
RGB 5 |
Displays/Edits RGB Channels. (!) |
Paste Options
When you import pixels via a paste Ctrl/Cmd v operation you are presented
with this dialog.
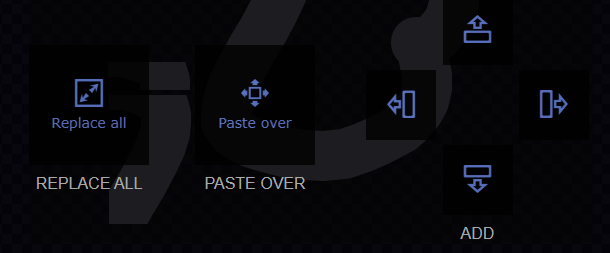
REPLACE ALL allows the incoming clipboard image to reset the image area size.
This option is synonomous with the New from Clipboard operation in programs
like Gimp.
PASTE OVER causes the incoming clipboard image to fill up a new selection
rectangle. You can now position the selection by dragging it around.
Clicking outside the selection will commit the (undoable) operation.
Pressing Escape will abort the operation.
ADD allows you to grow the image area in the requested cardinal direction
according to the incoming clipboard image.
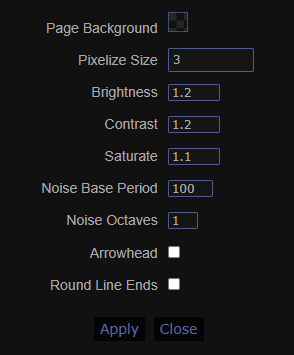
Settings
Here are some hidden settings revealed by pressing its hotkey, i.
Grid Settings
Here are some more hidden settings revealed by pressing its hotkey, I.

Credits
ImageEditor is built atop the open-source tool Pinterro by Ivan Borshchov.