![]()
/ Interface / Grid Editor
ChucK VM Panel . Workspace Panel
Code Editor . Graph Editor . Grid Editor
Image Editor . SoundPlayer
Log Panel . Graphical Plots
Wherein we describe the interface for authoring notes and session events on a grid.
Fiddle's
Grid Editortogether with theGraph EditorandCode Editorprovide the foundation for a ChucK composition workflow.Here we present details of the Grid Editor interface.
As described elsewhere, the simple act of clicking on a
.fgrdfile in the Workspace Panel has the effect of opening the grid file in its own Grid Editor panel. You can also trigger the creation of an empty Grid Editor session via the Layouts Menu.
Overview
The Grid Editor operates on grid files with file extension .fgrd.
There are two kinds of grid files, Note Grids and Session Grids.
When opening an .fgrd file the Grid Editor automatically detects the
grid type and configures its interface accordingly.
Note Grid
A note grid comprises one or more layers. You can activate, create, delete,
and rename layers using the Layers Panel. You can also
activate a layer with the Context Menu.
Editing and selecting operations occur only on the Active Layer.
All note grid layers comprise 128 rows, each of which is associated with a MIDI note frequency. You can display a subset of rows using the Grid Panel.
A column is the basic measure of note duration in a note grid. You associate
the correspondance between a column and a musical time unit through the combination
of BPM, Column Unit and Time Signature using the Grid Panel.
A section is a column-range used to annotate your notes and navigate through
time.
A note, or cell, is represented by a colored rectangle consuming a fractional
multiple of columns on an individual row. Every note has an associated Velocity
which can be edited via the Cells Panel or directly on the
canvas in Draw Value Mode.
A note can contain internal MPE (Polyphonic Expression) data. The MPE
data resides within the note so that it follows its cell when it is moved
or scaled. When sufficiently zoomed in, you can edit MPE directly in the
same manner that you edit note-wide velocity.
You can pan, create, delete and edit notes in the Active Layer according to
the current Mouse Mode.
Notes can be entered into a note grid by:
- directly "painting" them in the canvas
- recording them from MIDI input device
- importing them from a MIDI file
Session Grid
A session grid is composed of a single layer of events on channels instead
of notes on MIDI frequencies. This is reflected in the row labels.
Note grid row labels take the form B4, C5, Db5, ....
In contrast, session grid rows are named Ch 0, Ch 1, Ch...,
Whether editing a note or a session grid, every cell has a time location and duration. This means the column labels are the same for both grid types and in other ways the interface for both grid types are nearly identical.
In a session grid, a cell represents the triggering of one or more programs, or clips. You can think of Session Grid cells like buttons that launch musical snippets or entire ChucK programs. Each cell conveys three pieces of information:
- the event launch/start time
- the event duration
- the
program, orsectionto trigger in downstream clients from the associated channel.
It is important to understand that the effects of delivering cell events are unknown to the session grid. It doesn't know or care what happens when the events associated with a cell are delivered. The actions associated with these events are determined by the consumer of the note-grid events. For example, one session grid channel can trigger a stream of MIDI notes and trigger the playing of various sound files.
The duration of a session grid event characterizes the timing of the delivery of the session events and not necessarily to the duration of the material triggered by the events. Specifically, as long as a session event duration is longer than the triggered material, its duration can cause confusion. Depending on your application, it may behoove you to go to the extra trouble of syncing session event durations with triggered event durations. On the other side, if the session event duration is shorter than the triggered material you can achieve potentially useful clipping of the source material.
Like note grids, session grids can associate higher-frequency MPE events
with each cell. The most common application for MPEs in this setting are
the Pan and Volume signals than can be routed to a Channel Node's
Controller port.
Session grids are used by the SessionGrid node in ChucK graphs to control downstream nodes like NoteGrid and SoundBufBank
Interface Components
Mouse Modes .. Canvas Context Menu .. Note Context Menu
Sidebar Panels .. Record From MIDI Device
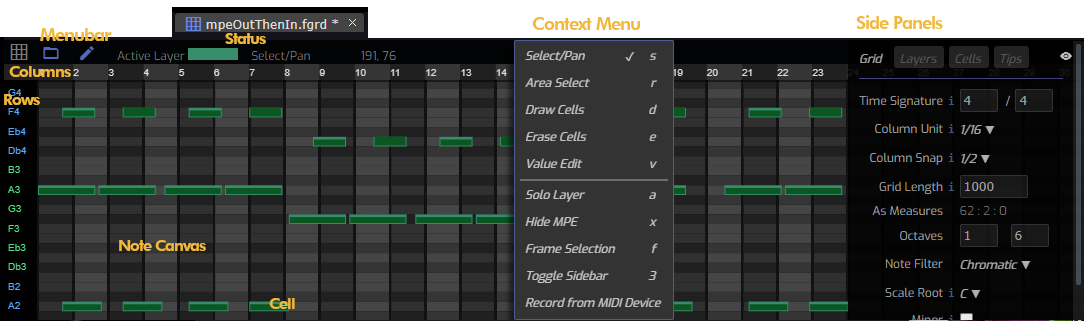
Here is the interface for a note grid file. As indicated above, the session grid interface differs in only a few minor ways, so we'll focus most of the following discussion on note grids.
The Menubar

The Menubar is the home of the Edit and File menus as well as the status area.
File Menu
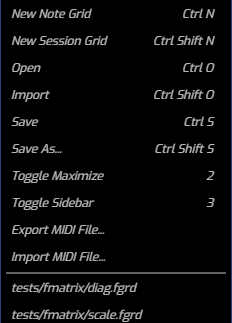
folder_open The File Menu offers the
standard fare for opening, renaming and saving your notes. Fiddle's
note grid files are identified by the file extension .fgrd. It is this
class of file that the Grid Editor is responsible for editing.
If you select one of the New commands, an empty, untitled session of
the requested grid type will result. In contrast, select Open to fill
the current session with the notes or events found in a file that you select
It's usually preferable to open grids files via the workspace,
but on occasion you may find these menu items handy.
Save and Save As... perform the obvious functions, the latter offers
you the opportunity to rename the file while saving.
Keep in mind that moving note grid files from one place in your workspace
may have a negative impact on all ChucK Graph files that reference your
notes. Should you be bitten by the spring-cleaning bug, the good news is
that the .chg format is ascii and can be searched and edited manually
or with command-line tools like sed and grep.
Import MIDI File... is only present for note grids and causes the
selected .mid file to be imported into the current session as a new layer.
Because .mid files can take many flavors, it's possible that the import
will produce unusual or incomplete results. Your mileage may vary.
Export MIDI File... is only present for note grids and exports all
layers of your current session to a .mid file. This operation is
guaranteed to produce a functioning MIDI file but may produce odd results
when imported into an 3rd party tool. This is a consequence of the manner in
which the note expression data is encoded (we follow the MPE spec for this).
If a session is comprised exlusively of notes and velocity your export
success rate should be quite high.
Recent Files enumerates recently edited files so you can
conveniently open them without the File Browser.
Edit Menu
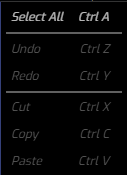
edit
The Edit Menu offers the usual collection of functions that operate
relative to the current selection. In the context of Grid Editor,
the selections of consequence are Cells and once you've established
a selection of cells via the Canvas you can Cut, Copy
or Paste them. There is an internal clipboard that stores
the results of these operations and it's relative to this clipboard the
Paste operates.
Status Area

The Status Area provides status about the Active Layer and the current Mouse Mode. Column coordinates are also updated as you move your mouse within the canvas.
The Canvas

Navigation
The canvas is where all the editing happens. Before we start editing it's wise to learn the navigation modes for changing the canvas view. Even before we change the view let's explore the cacophony of color cues presented in the interface. Note that you can select alternate Grid display modes in the Grid Panel.
The column labels represent the measure and beat (when zoomed in
sufficiently) and these are governed by your Time Signature.
Odd measures are darker than even measures.
The row labels depict MIDI note in note-name/octave form. Each octave is colored differently from its neighbors and the Scale Root (or key) is highlighted in orange. The row background color highlights the "white keys" on a piano keyboard.
It's important to remember that the canvas configures this information according to the current view. When zoomed out a subset of row and column labels are presented. When zoomed in, new details emerge.
To navigate the canvas from Select/Pan mode:
mouse-dragto pan around the grid. You can escape to pan mode from other mouse-modes by pressing theCtrl/Cmd Keybefore dragging. Make sure to click in an empty area or you may trigger a select/move/resize operation.mouse-wheelto zoom in or out in time (columns get fatter or skinnier).Shift mouse-wheelto zoom in or out note-height (rows get taller or shorter) Taller rows are preferred for Value Edits.frame (f)to zoom and center on the currently selected notes. If no notes are selected, all notes in the active layer are framed.
Mouse Modes
The Mouse Modes are intended to streamline the common editing tasks. Hotkeys make it simple to quickly switch between mouse modes and feedback is provided in the menubar status region.
Select/Pan (s): In addition to the navigation features described above this mode is used toselect: click/release a note to select it.Shift-clickto toggle its selection state. You can select multiple notes with multipleShift-clicks, as well as using the Area Select mode below.move: click-drag over the middle of a selected note will cause all currently selected notes to become drag-movable. The drag-move operation is subject to Column Snap unless you depress theCtrl/Cmdkey after initiating the action. If you hold theAltkey when intiating a move, the result is aDuplicate + Moveoperation.resize: click-drag over/near the edge of a note to change the left or right edge of a note. As seen below, the cursor icon changes when your mouse is in "the resize zone". Resizing a note has the effect of changing its duration. If you have multiple notes selected you can group-resize them with careful use of theShiftkey. The drag-resize operation is subject to Column Snap unless you depress theCtrl/Cmdkey after initiating the action.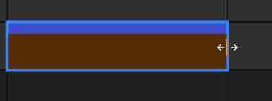
Area Select (r): this mode allows you to select a collection of notes with a rubber-banding box.Draw Cells (d): click-dragging in Draw-Cells mode results in the painting of new cells under the mouse. You can use the note filter to constrain your drawing to the requested scale or mode.Erase Cells (e): click-dragging in Erase-Cells mode result in the erasure of existing cells under the mouse.Draw Values (v): click-dragging in Draw-Values mode updates the Active Layer Value associated with the position under the mouse. Painting over empty or inactive regions has no effect. TheVelocitychannel is present in all notes and the Draw Value mode allows you to literally paint Velocity across multiple notes when it's the active layer value. Layer Values other than Velocity areMPEvalues and these can only be painted when sufficiently zoomed in and over a note that has preexisting MPE values. You can populate MPE values on a note using the Note Context Menu.Column Select: allows you to drag-select a column range and is independent of the mouse mode. To select columns, just click-drag horizontally within the column label area. Once defined you canright-clickto create a newsection. You can inspect and modify your sections in the Sections Panel. If you click-release in the column label area you identify thecurrent columnfor use by paste operations. To remove/hide the current column indicator, just Shift-click in the column label area.
Hotkeys
| Operation | Combo |
|---|---|
| Context Menu | right click |
| Zoom X | wheel |
| Zoom Y | Shift+wheel |
| Pan | Ctrl/Cmd+drag |
| Toggle Solo | a |
| Mode Select | Key |
|---|---|
| Select/Pan | s |
| Rect-Select | r |
| Draw Cells | d |
| Erase Cells | e |
| Draw Value | v |
| Escape To Pan | Ctrl/Cmd-drag over empty region |
| Escape To Rect-Select | Alt-drag over empty region |
| Editing (in Select/Pan mode) | |
|---|---|
| Move Duplicate | Alt-drag over cell |
| Unsnapped Edit | drag-edit then Ctrl/Cmd |
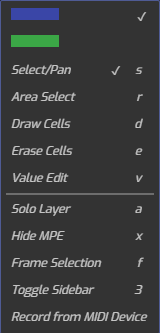
Canvas Context Menu
The Canvas Context Menu is presented when you right-click in an empty region
of the canvas. It delivers a number of helpful tools straight to your fingertips.
If your session includes more than a single layer, you can activate a layer
by selecting its color.
Remember: edit and selection operations only apply to the active layer.
The Canvas Context Menu also allows you to change or verify the current mouse mode described above.
Solo Layer / All Layers is a toggle causing all non-active layers to be
hidden or displayed according to the current state. More nuance
control over layer visibility is available in the Layers Panel.
Hide MPE / Show MPE is a toggle that controls whether to display optional
internal MPE data. Keep in mind that no matter what this setting is,
MPE data is hidden when it would be too small onscreen.
Frame Selection zooms and centers on the currently selected notes. If no
notes are selected, all notes in the active layer are framed.
Toggle Sidebar causes the sidebar panel to appear or disappear.
Record from MIDI Device allows you to create notes using a MIDI input
controller. More details below.
Note Context Menu
The Note Context Menu is presented when you right-click over a note in
the active layer. If the note is selected, commands apply to all members
of the selection. Menu contents depend on the state of the note under
your mouse as well as the active layer and active layer value.
 In this example we can infer that the
 Afterouch layer value is current and
because it is an MPE value we are offered these options. These two commands
are disabled when the active layer value is Velocity.
Remove [MPE Layer] removes/deletes all MPE data for the current
active layer value on all selected notes.
Add/Resample [MPE Layer] forces the existance of MPE values at
a regular interval within the selected notes. If MPE data is already
present within a note, it is resampled to the specified interval.
A value of 10 indicates that the note will contain 10 equally spaced
MPE values. If your MPE source is a MIDI device or file, it's possible
that you'll have irregular spacing and durations. This option comes
in handy when you wish to "paint" the values.
The following options are available for both note-wide (Velocity) and MPE (intranote) values.
Scale multiplies the active layer values in all selected notes
by the provided value.
Set sets the active layer values in all selected notes to the provided
value.
Remove All MPE removes all MPE layer values in all selected notes
no matter what the active layer value is.
The following note-context commands are available in all cases:
Snap Left Edge moves the left edge of all selected notes to the nearest
snap location as specified here. Note that this operation
can affect the duration as well as the timing of the affected notes.
Snap Right Edge moves the right edge of all selected notes to the nearest
snap location as specified here. Note that this operation
can affect the duration as well as the timing of the affected notes.
Snap Cell moves all selected notes to begin on the nearest snap locations
as specified here. Note that this operation preserves
note durations.
Scale Duration multiplies the duration of all selected notes by the
provided value. Note that this operation preserves the note down
position.
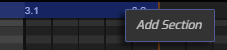
Column Context Menu
The Column Context Menu is presented when you right-click over the column
label area of the canvas. If a column-range has been activated, the menu
allows you to create a section which will then appear in the Sections Panel.
The Sidebars
The sidebar houses a collection of panels that are selected by
clicking on the desired tab. The sidebar visibility is toggled
with the visibility icon as well
as the 3 hotkey.
The Grid Panel
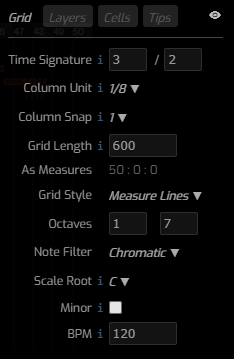
The Grid Panel presents information that characterizes the entire note grid. All layers share these properties.
Time Signature describes the meter of your note grid. The value 3/2
indicates that a musical measure is composed of 3 beats whose duration is a
1/2 note (minim). This is used primarily to provide visual cues for measures
in your grid. It is also used during MIDI Recording.
Column Unit the note-size to associate with a grid column. 1/8 signifies
that the columns represent an eighth note (quaver). It's typically chosen
to match the most common note-type in your composition. Note that this
value does not represent the smallest representable unit.
Column Snap describes the size of the snap unit relative to the column unit.
1 signifies that when snapping is active we'll snap to column boundaries.
1/2 signifies that snaps occur at 1/2 column units.
Grid Length governs the size of the background grid (when visible). It
is measured in columns.
As Measures shows the conversion of your Grid Length into measures according
to the current Time Signature.
Grid Style offers a choice of how to display the background grid. Options
include: On, Off, Measure Lines.
Octaves filters the notes displayed in the grid by an octave range.
Note Filter filters the notes displayed in the grid by a scale or mode. This
can be used to ensure note painting produces notes that live
in a key. Note that the note filter interoperates with Scale Root and
can also hide active notes from view.
Scale Root specifies the root note for your composition's scale and relates
to the musical key. The scale root is highlighted in the row labels. It
is also included in exported MIDI files.
Minor specifies whether the key associated with the Scale Root is major
or minor. This information is included in exported MIDI files as part of
the key signature. Note that Note Filter is not exported to MIDI. It's value
may be inconsisten with the MIDI key implied by Scale Root and Minor.
BPM specifies a tempo for the note grid. This is used during
MIDI recording by the metronome. It is also exported
to MIDI files. When referencing .fgrd files in ChucK compositions
this value isn't relevant since it's the role of the TimeKeeper
to wrangle tempo amongst the players.
The Layers Panel
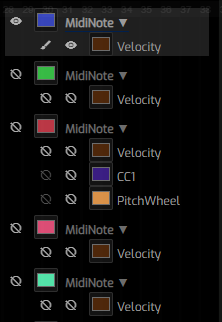
The Layers panel provides an overview of your note grid's layer state.
A note grid is composed of one or more layers and each layer has an
associated set of layer values that can be associated with the notes on
that layer. Velocity is a special layer value that is present in
all MIDINote layers and on every note therein. A session grid is composed
of a single layer and replaces a Gain value for the note grid Velocity
value.
At right we see a note grid with 5 layers. We can infer:
- the first, top-most, layer is the active layer because its background color is lighter than the other layers.
- we are in layer solo mode because many buttons are disabled and have the hide_source icon.
visibility indicates whether a layer or layer value is displayed.
brush indicates which layer value is active for painting. Only the active layer value associated with the active layer can be painted.
If we wish to paint or edit the CC1 value on notes in the 3rd layer we must:
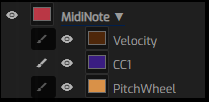
- activate the third layer
- ensure that the layer value,
CC1is displayed - ensure that the layer value,
CC1is active
At right you can see the result.
You can change the display color for layers as well as control values. Just click on a color swatch, select a color, then click-outside the color picker.
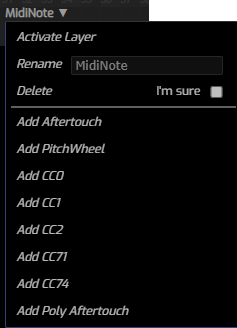
Layer Menu
You can change a layer's name as well as configure layer values via the Layer menu. This menu is triggered when you click on the layer title area. Its contents depend upon the grid filetype as well as the layer's type. A session grid is constrained to a single layer and so activating, renaming and deleting aren't meaningful.
For note grids, the following commands are available:
Activate Layer causes this layer to become the active layer.
Rename allows you to assign helpful names to your layers.
Delete deletes a layer (but only if you check the I'm sure checkbox).
Add Layer Values the remaining items on the menu enumerate common MIDI
expression channels. Selecting an item from the list causes it to appear
in the Layer Panel below/within the layer. This unlocks the capability
to add the layer value to notes on that layer.
The Cells Panel
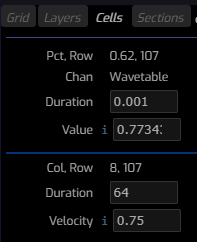
The Cells Panel presents low-level details about the currently selected notes. When no notes are selected this panel is empty.
At right we see that there are at least 2 cells selected.
Col/Row indicates the column, row associated with the note. The value 8
suggests that the note is aligned with the 8 column in our grid. Columns
don't have to be intgral; you often find cells with columns like 8.25.
The value 107 tells us that it's row 107 which happens to coincide with
MIDI note 107 which is B6. If you select a sub-cell on the active channel
that, too, will appear but instead Col/Row you'll see Pct/Row indicating
that the sub-cell is positioned relative to its container.
Duration indicates the length of the cell measured in columns. The value
.85 suggests that the note was held for 85% of the duration ascribed to
columns.
Velocity indicates that we've selected a note, rather than a subvalue
within a note. A Velocity of .858 is "pretty loud".
As mentioned above, you can inspect subvalues associated with the active
layer value by zooming in on a note, then double-clicking on a value.
At right we see selection with Pct/Row, 0.62, 107. Here 0.72 conveys
the notion that the value is associated with a time 72% of the duration after
the "parent" note begins. As before the second field, 107, tells us that
we're operating on MIDI note 107. A duration of 0.001 tells us that the event
consumes 1/1000th of the parent note. The tooltip help next to the Value
parameter may provide us the insight on what the values represent.
Armed with that information and assuming that we've selected a PitchWheel
subevent, we can interpret a value, .58, to mean that the bend is 8% "north
" of the the target note, 107. PitchBend values in MIDI are centered around
the target note and, by default, range 2 semitones over and under the target.
Every MIDI Event type comes with a different set of rules and interpretation.
For more details, check out this page.
The Sections Panel
The Sections Panel organizes your collection of sections. If you haven't created any sections, this panel will be empty. Sections are used to:
- quickly navigate in time.
- identify a subset of notes, say a chorus, for performance by Session Grids
through their per-event
Programvalue.
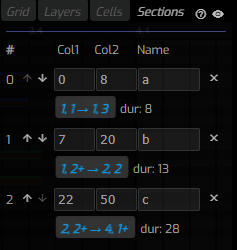
Here is a selection of columns from measure 2, beat 3 through measure 3, beat 1.
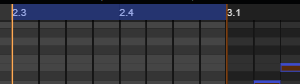
 As described above, you can always click-drag in the column area to sweep out
a section. Only when you right-click in this area and save a section will
it appear in the Sections panel.
As described above, you can always click-drag in the column area to sweep out
a section. Only when you right-click in this area and save a section will
it appear in the Sections panel.
At right we see 3 sections defined. Numbers on the left represent the
Section Id and this can be used by external programs to refer to the notes
within that section. The up and down arrows allow you to reorder the sections
and thereby change their identifier. The x button at the right of each
section deletes it and will reassign the Section Id for all sections below it.
Associated with each section are three editable fields, Col1, Col2 and Name.
The first two numbers represent the columns that bound a section. They are
specified in columns and converted to Measure.Beat format according to the
Time Signature specified in the Grid Panel. The Name field
can be used to help you remember the significance of the section but otherwise
plays no functional role.
Below these three fields is a navigation button annotated by the Measure.Beat
representation of the section. When clicked, the canvas re-selects the section
and scrolls it into view. Note that the current viewing scale will not be
changed by this operation and so the section may not be entirely visible
upon completion. Adjacent to the navigation button is a column-unit
representation of the section duration. This can be useful in ensuring
that your Session Grid event durations match section durations.
Record MIDI
The Record MIDI option is present for Note Grids but not available for Session Grids.
If you have a MIDI input device you can use it to add notes to your Grid Editor note sessions. Below you can see the Record MIDI dialog.
Workflow
- Select an insertion point before entering the dialog. This is done by clicking in the column label area of the canvas and the result is an amber vertical bar representing the insertion point.
- Raise and configure the Record MIDI dialog (details below)
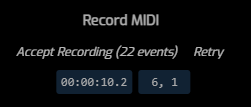
- Record a session and either accept it (closing dialog) or retry.
- On completion your new notes are selected and appear in a new layer.
You can repeat this workflow until you're satisfied with the result. At any point you can copy and paste from one layer to another and use the Layouts Panel to rename and/or delete vestigial layers.
Interface
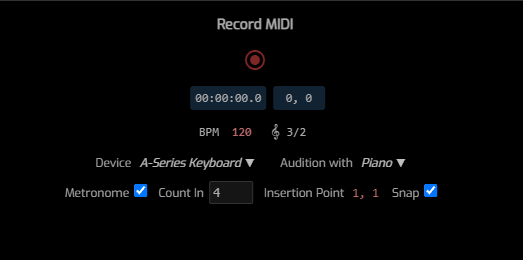
radio_button_checked initiates a recording session. pause ends a recording session.
Recording Time Fields update in seconds and Measure, Beat format.
BPM, Time Signature control the tempo and time signature for the recording.
Device selects from your 1 or more MIDI input devices.
Audition with selects an instrument to perform the MIDI events as they
are played. You can test the instrument and device before you press the
record button. Currently, pitchbend and other effects aren't emulated in
the audition mode. They are recorded however, and will affect your ChucK
instruments in the usual fashion.
Metronome produces a metronome sound associated with your BPM and time
signature. The metronome produces slightly different sounds when in the
count-in period than in the recording period.
Count In specifies the number of beats to count-in before recording begins.
Insertion Point specifies the location to deposit the recording notes.
The value 1, 1 signifies that the result will be begin at Measure 1, Beat 1.
The insertion point is controlled by positioning the column cursor by clicking
in the column label area. It can also be removed by Shift-clicking there.
Snap controls whether to quantize the recording session according to the
current Column Snap.