/ Examples / Control / CCImageSampler
NoteStreams .. Instruments
Filters .. Effects .. LiCK Effects
Plot .. Utility .. Pure ChucK
Wherein we examine images as a means to express parameter changes. Right-click to copy this example to your workspace
The Example
In this example we filter a repeating note sequence using the CCImageSampler node. The image lookup locations are generated by the CCGen2D node. In this example we use the time-varying image samples to control the parameters of a BandPass filter node.

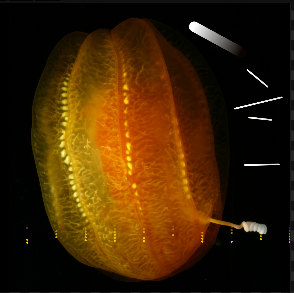
 At right is the image we're using for this example. As detailed below
we use the red and green channels of this arbitrary image to control
the filter parameters. We can see faint yellow dots representing the
sample positions in the Image Editor.
The CCGen2D node generates the yellow dots dynamically and updates the image overlay during performance. You can paint or draw into the image and when you save your changes, CCImageSampler automatically reloads it and thus modifies the peformance.
When a sample encounters "hot" pixel values the extreme filter parameters are delivered to the filter. The hand-painted grayscale lines produce a rhythm click as the generator's samples encounter them.
Right-click to copy this example to your workspace
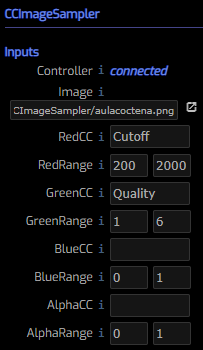
ImageSampler Node

Controller is a connection point for the upstream generator of sample
image positions. CCImageSampler listens on this connection for ImageXY or
ImageX/ImageY control messages. Values are normalized pixel coordinates
between 0 and 1. Without an upstream connection the CCImageSampler receives
no coordinates and therefore produces no image samples.
Image is the name of the image to sample. You can drag & drop an image
from the workspace panel or enter the filename directly. Clicking on the
arrow to its right causes the image to be displayed in an
Image Editor panel.
RedCC controls the name of the control-change message the CCImageSampler
produces on its output when the red channel of the image is sampled. Here,
we see that the red channel controls Cutoff which happens to be the
BandPass parameter for the filter center.
RedRange causes the pixel sample value between 0 and 1 to be remapped into
a range appropriate for RedCC. Here we vary the cutoff frequency between
200 and 2000 Hertz.
GreenCC establishes the name of the CC message associated with green
channel samples. Here, we see that the green channel controls Bandpass's
Quality parameter.
GreenRange remaps the green channel values from 0-1 onto 1-6.
BlueCC, AlphaCC are empty and this means that their pixel values will
not produce any CC messages.
Gen2D Node
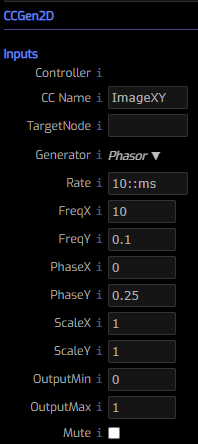
The Gen2D node generates 2 dimensional control signals and is the sibling of our 1D CCGenerator. Since our goal is to generate sample points for CCImageSampler this is the perfect tool for the job. Gen2D generates a rich collection of samples with only a few easily mastered parameters. As you play with the parameters it is very helpful to have the Image Editor panel opened in an adjacent panel.

Controller is a connection point for controlling the CCGen2D node. Here
it is unused but the mind boggles at the idea of automating some of these
parameters.
CC Name is the name of the CC message we generate. ImageXY was chosen
because this is the name required by CCImageSampler.
Target Node allows you to target a subnode in a node-group. Here it is
unused.
Generator selects the pattern generator from:
- Random produces a random point in the 2D plane.
- Random Walk produces a random walk across the 2D plane.
- Perlin produces a smoother random walk across the 2D plane.
- Lissajous produces patterns ranging from classic oscilloscope images to circles and ellipses.
- Phasor can be used to scan the 2D plane linearly in either/both X and Y.
In this example we selected Phasor with carefully selected values for
FreqX and FreqY to produce a Matrix-like
raining pixel effect.
Rate controls the CC generator execution rate. At 10::ms we generate
100 samples per second. Changing rate may interact with your FreqX/Y
settings so its usually wise to adopt a fixed value before investing heavily
in tweaking the remaining parameters.
FreqX, FreqY independently control the X and Y pattern frequency.
PhaseX, PhaseY independently control the X and Y phase or pattern offset.
ScaleX, ScaleY independently control the X and Y scale of the pattern.
Usually these values should be less than 1, though there are times where
larger values are useful.
OutputMin, OutputMax remaps the [-1, 1] values of the pattern generator
onto the coordinate range required by the CC consumer. Since we're targeting
CCImageSampler / ImageXY, we'd like our values to reside in the [0-1]
range. Values within thsi range can be used to constrain samples to a subset
of the entire image.