![]()
/ Topics / Audio In + Out
Asset-based, Nonlinear Workflow
On Graphs and Code . Authoring Musical Notes
Player . Instrument . NoteStream . TimeKeeper
Channels, Effects . Control Signals
Audio I/O . MIDI Input . VST3 Plugins
Wherein we discuss how to record audio into ChucK and get it back out too.
Intro
Here we present an overview of the Audio In and Audio Out workflows in the Fiddle + ChucK context.
If you are having problems with connecting you input devices to your computer please review the Trouble Shooting reference. That's also the home of The Nuts and Bolts of Digital Audio.
Audio-In
Let's examine this simple graph for recording live audio. You can find the example here.
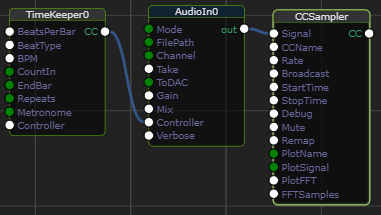
Here is our role call:
- TimeKeeper emits optional metronome clicks and and signals AudioIn count-in and duration to control the recording.
- AudioIn operates in a number of modes:
- to monitor input signal
- to record input signal to a one or more soundfile
takes - to playback a previous
take
- CCSampler is an optional node used here to monitor the signal RMS and/or Frequency (via FFT).
AudioIn plays the central role in our recording session so we'll focus most of this discussion on its inner workings. The design of the AudioIn node recognizes the iterative nature of audio recording.
The Parameters
Since it usually requires multiple takes before a recording is deemed perfect,
a few parameters co-operate to produce this recording workflow:
- monitor input signal(s) to ensure that the recording levels and effects chain (below) are perfect.
- record multiple takes until one or more recordings are deemed good.
- switch between recordings to identify the best
- lock in a final version for inclusion in a larger mix or composition.
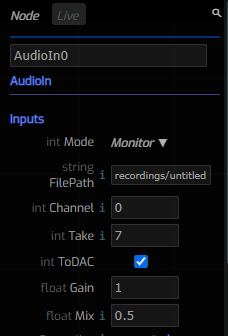
Mode
These are the AudioIn modes:
- Monitor causes the input signal to be routed through the effects chain
and then to the output port without being committed to a sound file. You
can also think of this mode as a
performance modesince you can hear the live output signal. In monitor mode you can verify levels, ensure that feedback doesn't occur and tweak an optional effects chain. You can also jam your heart out and leave behind trace of the heights to which your jam-spirit rose. - Record routes the input signal through the effects chain and into both
the output port as well as to a new sound file embodying the current
takeand optionalrepeat. - Playback routes a recording directly to the output port. You can easily change the take to compare different versions. When a perfect take is achieved, the old takes can be deleted from disk. Uou can also keep them around for remixes, director's cuts or historical record.
- Disable causes the AudioIn node to become a lifeless husk: no sound input and no sound output.
FilePath
The FilePath parameter represents the workspace-relative
base filename for your recordings. The default value, recordings/untitled,
is combined with the current take and optional repeat to produce files
like: recordings/untitled_0.wav or recordings/untitled_0_1.wav (for repeat 1)
to appear relative to current workspace. Clearly untitled is
a poor name choice and it's likely that you'll prefer a more descriptive
directory name as well. Note that we don't decorate the filename with the
channel number since multi-channel recording setups have multiple instances of the
AudioIn node. There you should replace untitled with names like leadguitar,
vocals1, and so on. In other words, the channel number isn't a great way
to describe its content.
Channel
The Channel parameter selects the ADC input channel. For single or stereo
input devices, select 0 or 1. For more input channels, select the channel
here, but also modify the ChucK vm options
to include --inN (where N is the number of channels your device supports,
typically 4, 8 or 16).
Take
This value is appended to the FilePath (eg "recordings/myfile_4.wav") for both Record and Playback mode. It is up to you to increment it when you want to save a viable take and create a new version. You can also set it manually to audition a prior version. Beware that each recording session (associated with its ChucK session) will overwrite, and thus destroy, a previous version of a take.
It is up to you to protect against unwanted stompage by setting the
takecarefully.
If you request TimeKeeper to perform repeats, filenames will have the non-zero loop counter included in the name.
ToDAC
This is a convenience to route the AudioIn output signal to the DAC for monitoring. If you'd like to route the output signal through a Channel Network for further processing, simply uncheck this value.
Effects Chain
As is true with the Channel Node, the AudioIn node supports nested effects chains. Again, this can be viewed as a convenience since it can be achieved with a separated Channel node. However, if you want to "burn-in" effects to your recording you need to populate the effects inside the AudioIn node. Conversely, if you want to preserve the unvarnished input signal you should leave the AudioIn effects chain empty. For the jamming-inclined, you can bury your favorite effects chains in diverse AudioIn nodes and, according to your jamming whimsy, switch between them by activating one graph or another.
Here's a simple effects chain:
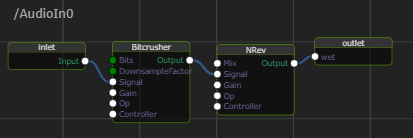
As described elsewhere, you can edit
the effects chain for your AudioIn node by double clicking on the node.
Now you'll see its inner workings and introduce processing nodes between
inlet.Input and outlet.out. To "zoom out", simply double-click on any
empty (non-node) graph area.
Audio-Out
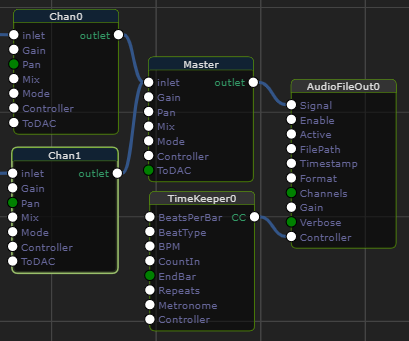
Let's examine a simple setup for rendering audio to a soundfile. You can find this example here.
You may have noticed that the process of getting audio out of ChucK is partially covered in the Audio In topic above. The idea is simply that any on-disk representation of sound is a renderering of the sound that can be distributed to audiences. Above, we stored an individual audio track into a sound file as a part of the recording workflow. More generally you'd like to route any sound into a file. That is the purpose of the Audio File Out node.
In contrast to the AudioIn node, the input signal can be configured to meet
your diverse requirements. You can have any number of AudioFileOut nodes
and explicitly route different audio channels into different sound files.
You can introduce new Channel nodes to mix upstream channels and
produce the optimal set of sound files for your production.
Below, we route the output of Master to AudioFileOut for recording.
Here are some typical use-cases:
- A single, permanent, node for a final recording. If you wish to render the
output of the entire production, an
AudioFileOutnode with no connection to its Signal will record the output of theDAC. - One or more transitory nodes for mix-down to a pre-rendered audio asset. Once an adequate recording is captured, the transitory recording node is replaced with a SndBuf node bundled around your recording.
- One or more permanent nodes to store stems for a later mash-up or mix-down.
Here let's walk through the principal AudioFileOut parameters:
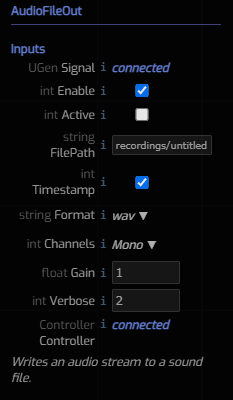
Signal As mentioned above you can choose to route a signal to this
port or you can leave it disconnected. In the latter case, the soundfile
will contain the output of the DAC mixed into one or two channels.
Enabled This is the master switch that controls whether recording can
occur. Only when Enabled (the default condition) will the Active parameter
have an effect.
Active This is the the parameter that controls when recording is actually
taking place. The value of this parameter is only meaningful if Enabled is
true and if you haven't connected a TimeKeeper. In that case you can manually
toggle the Active state during a live session to initiate and terminate a
recording.
FilePath This is the workspace-relative base filename for a recording. The
file extension and optional timestamp are added to this base to produce a final
filename. For example, the default value, recordings/untitled, would produce,
or overwrite, a file named recordings/untitled.wav.
Timestamp In an iterative Fiddle session it may be too easy to stomp on a
valuable soundfile. For this reason, the Timestamp parameter should be used
to minimize this chance. Now on each ChucK session we'll see new files
deposited with names like recordings/untitled(Thu Nov 4 13h56m25 2021).wav.
You may end up with many more files than you need but you will prevent
accidental stompage.
Format Currently ChucK supports .wav and .aiff soundfile formats.
These are very common in audio production because they are uncompressed
which means maximum quality and file size. To prepare your .wav or .aiff files
for broader distribution its common to transcode them to a compressed
file format such as .mp3, .m4a, .ogg or .flac. There are many utilities
for achieving this and if there's enough interest we'll include some options
with the Fiddle package. But it's hard to beat the utility of
Audacity and we heartily recommend including
it in your audio production toolchest.
Channels Currently ChucK supports mono and stereo sound files. Should
you wish to produce files with more channels, tools like Audacity
may be worth investigating.